5 min read
Getting started with Docker

If you've been into software or web development for any amount of time, chances are that you at least heard of Docker. Maybe you're like me and have avoided using it because it seems complicated or difficult to set up.
Well the good news is, it's actually super-simple. In this article, I will show you a few ways that you can get started with docker from what I've learnt so far.
What is Docker?
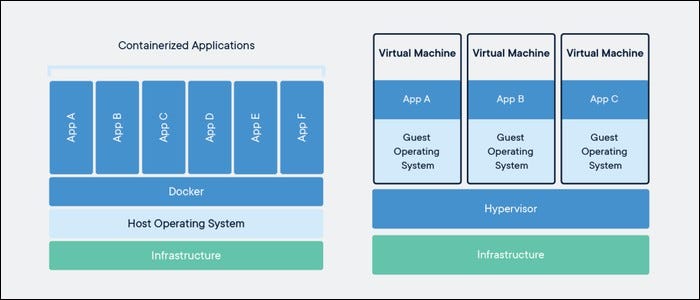
Before we go any further, let's define what Docker actually is. Docker is a piece of software that allows you to package an application, along with all of its dependencies, into a single unit and run it in an isolated environment called a container.
This means that if anyone, anywhere, on any machine, runs this Docker container, the application will behave in the same way because it has exactly the same environment.
A Docker container is a bit like a Virtual Machine, except that each container actually shares a kernel, which eliminates a lot of the overhead of creating and running a whole virtual operating system for each instance.
Why Docker?
Well hopefully you can see already that there is a great benefit to having these isolated containers, each with their own environment. It makes the whole software development and deployment cycle so much more straightforward, because once you have set up a container, you know its environment will not be changed by external factors.
As well as building containerised applications, Docker is also very popular for creating tests and integrating them in to your CI/CD workflow. Again, this is because you can guarantee that each test is performed in a completely fresh and isolated environment, so the tests should not be affected by side effects from other tests.
Finally, because you can rapidly start and stop docker containers on-the-fly, there are lots of opportunities to do some really cool things programmatically with Docker. For example, there is a company called Remote Interview that allows companies to set code tests for potential employees. The candidate submits the code online, the Remote Interview software runs some tests, and the candidate finds out if the tests passed or failed. And what technology do they use to test the candidates code? Docker, of course! Each time a candidate submits a new piece of code, it spins up a new Docker container to test their code. They've even kindly got a public GitHub repo so you can see for yourself how it works.
Getting started examples
All the examples that I give below are for JavaScript/NodeJs projects, but it should be fairly straightforward to modify them for different languages/frameworks.
I also presume that you have Docker installed on your machine. If you haven't, go do that now.
Hello World
What coding tutorial would be complete without a Hello World example?
Start by creating an index.js file and giving it a single line of code:
console.log('Hello World');Then in the same directory as your JavaScript file, create a file called Dockerfile (yes, without any extension). This is the file that will be used to build the image for your Docker container. An image is just a template for creating Docker containers. The Dockerfile should look like this:
FROM node:latest
WORKDIR /hello-world
COPY ./index.js .
CMD ["node", "./index.js"]
Let's walk through that line-by-line.
- FROM node:latest - The Docker Hub has thousands of pre-configured Docker images that we can use as a base for our own images - so chances are you'll always be able to find a base image for your application. In our case, we want to start from the latest Node image as our base, which will have everything set up to be able to run a Node application.
- WORKDIR /hello-world - Sets the working directory within the container to
hello-world. - COPY ./index.js . - copies the
index.jsfile from our machine into the working directory of the Docker container. - CMD ["node", "./index.js"] - Runs Node with
index.jsas the entrypoint.
Now we need to build our image. Open up a console window and navigate to your directory containing the index.js and Dockerfile files, and type:
docker build -t hello-world .This will create a Docker image with a tag of hello-world from the Dockerfile within this directory. We we now use the tag to tell Docker to run this container:
docker run --rm hello-worldThe --rm flag here just removes the container after it has finished executing. This is generally a good idea, otherwise you will end up with thousands of idle containers sitting on your machine.
If everything has worked, you should now see Hello World printed on your screen. Congratulations! You have now run your first application in Docker.
Creating a Docker container from a GitHub repository
I came up with this one for a project I'm working on where users can submit their code for testing by submitting a GitHub repository URL. I think it shows off some of the other cool things you can do with Docker too, and hopefully it will be useful for your applications too!
Because this Docker container needs to be a bit more complex and dynamic, we'll be writing a Bash shell script that runs on the Docker container. So start by creating a new directory and creating a file called docker.sh:
#!/bin/bash
repository_url=$1
branch=$2

git clone --single-branch --branch $branch $repository_url

cd $(ls -d */|head -n 1) #cd to first directory

yarn install
yarn test
Again, I'll explain this line-by-line.
- #!/bin/bash - In Linux this is known as a shebang, and just tells the console that this is a Bash script
- repository_url=$1/branch=$2 - $1 and $2 are the first and second command line arguments respectively. Here we are just assigning them to variables so it's clearer what they represent. When we start our Docker container, we will pass our GitHub repository URL and the branch we want to clone as arguments to the container.
- git clone... - Clones the Git repository and checks out the desired branch. The
--single-branchoption means that only that branch is downloaded, which saves time when running the container. - yarn install/yarn test - This assumes that the GitHub repository that we clone is a Node project that has a
package.jsonfile with a testing script defined. This will install all of the Node dependencies and run the testing script. Of course, you could think about making this more dynamic, but it works fine for my purposes.
In the same directory, we again need our Dockerfile:
FROM node

RUN apt-get update
RUN apt-get install dos2unix -y

COPY docker.sh /test/docker.sh
WORKDIR /test
RUN dos2unix ./docker.sh

ENTRYPOINT ["./docker.sh"]
Here I'm installing dos2unix and running against my ./docker.sh file. This is only necessary if you (like me) wrote the Bash shell script on a Windows machine. This is because the line endings need to be converted from Windows to Unix format in order for the script to execute correctly.
By specifying the docker.sh script as the entrypoint (without any arguments for now), this script will be executed when we start the Docker container. We can also choose our arguments during the docker run command, so that we can dynamically choose which repository to test.
Then we can run:
docker build -t github-repo .
docker run --rm github-repo https://github.com/walpoles93/basic-jest-test.git master
I have set up a basic Github repo that you can use for this tutorial. Hopefully it will also help as a starting point for your own projects too!
All going well, you should see that the Git repository is cloned and the Jest tests run against the project.
Conclusion
This tutorial has provided a couple of simple ways you can get started with Docker. Hopefully you can see that Docker isn't so scary after all, and actually it is very simple and straightforward to get a container running. Of course there are more complex things that can be achieved with it, but this serves as a good starting point on your Docker journey.